Port Forwarding for VM via VNF
This section outlines the steps to configure port forwarding for a Virtual Machine (VM) using a Virtual Network Function (VNF) in a cloud environment. Port forwarding allows external clients to securely access services (for example SSH, HTTP) hosted on the VM by mapping ports from the VNF’s public IP to the VM’s private IP. This approach improves network segmentation and control by routing all incoming traffic through the VNF layer.
The following are the high-level tasks required to configure port forwarding for a VM via a VNF:
- Accessing and Selecting a NAT Gateway
- Reviewing Configuration
- Accessing Port Forwarding Settings for NAT Gateway
- Adding a New Port Forwarding Rule
- Adding Details and Creating Port Forwarding Rule
- Verifying the Added Port Forwarding Rule
- Configuring NAT Settings In pfsense Firewall
- Adding a New Port Forward Rule in pfsense Firewall
- Adding a Rule with Value
- Verifying SSH Access Using Public IP
- Verifying VM Information and IP Configuration
Accessing and Selecting a NAT Gateway
This section outlines the steps to access and select a NAT Gateway within the Apiculus cloud platform. Before managing configuration or operational settings, users must navigate to the appropriate section of the dashboard and identify the NAT Gateway instance relevant to their network environment. This ensures that all subsequent actions are performed on the correct gateway associated with the intended Virtual Network Function (VNF).
The following steps guide you through locating and selecting your NAT Gateway from the dashboard:
- Navigate to the Networking > NAT Gateways section from the Cloud dashboard.
- Select the appropriate NAT Gateway (for example, ADC-R522-40-Test_ISOLATED_NETWORK) associated with your VNF.

Reviewing Configuration
This section offers a detailed review of the current NAT Gateway configuration within the Cloud environment. It includes essential system specifications, deployment parameters, and operational status to ensure the gateway is correctly set up and functioning as expected. Verify these details before initiating any advanced networking configurations, such as port forwarding or scaling operations.
The following steps guide you through reviewing key configuration details, checking operational status, and accessing internal system information necessary for validation and troubleshooting within your cloud environment:
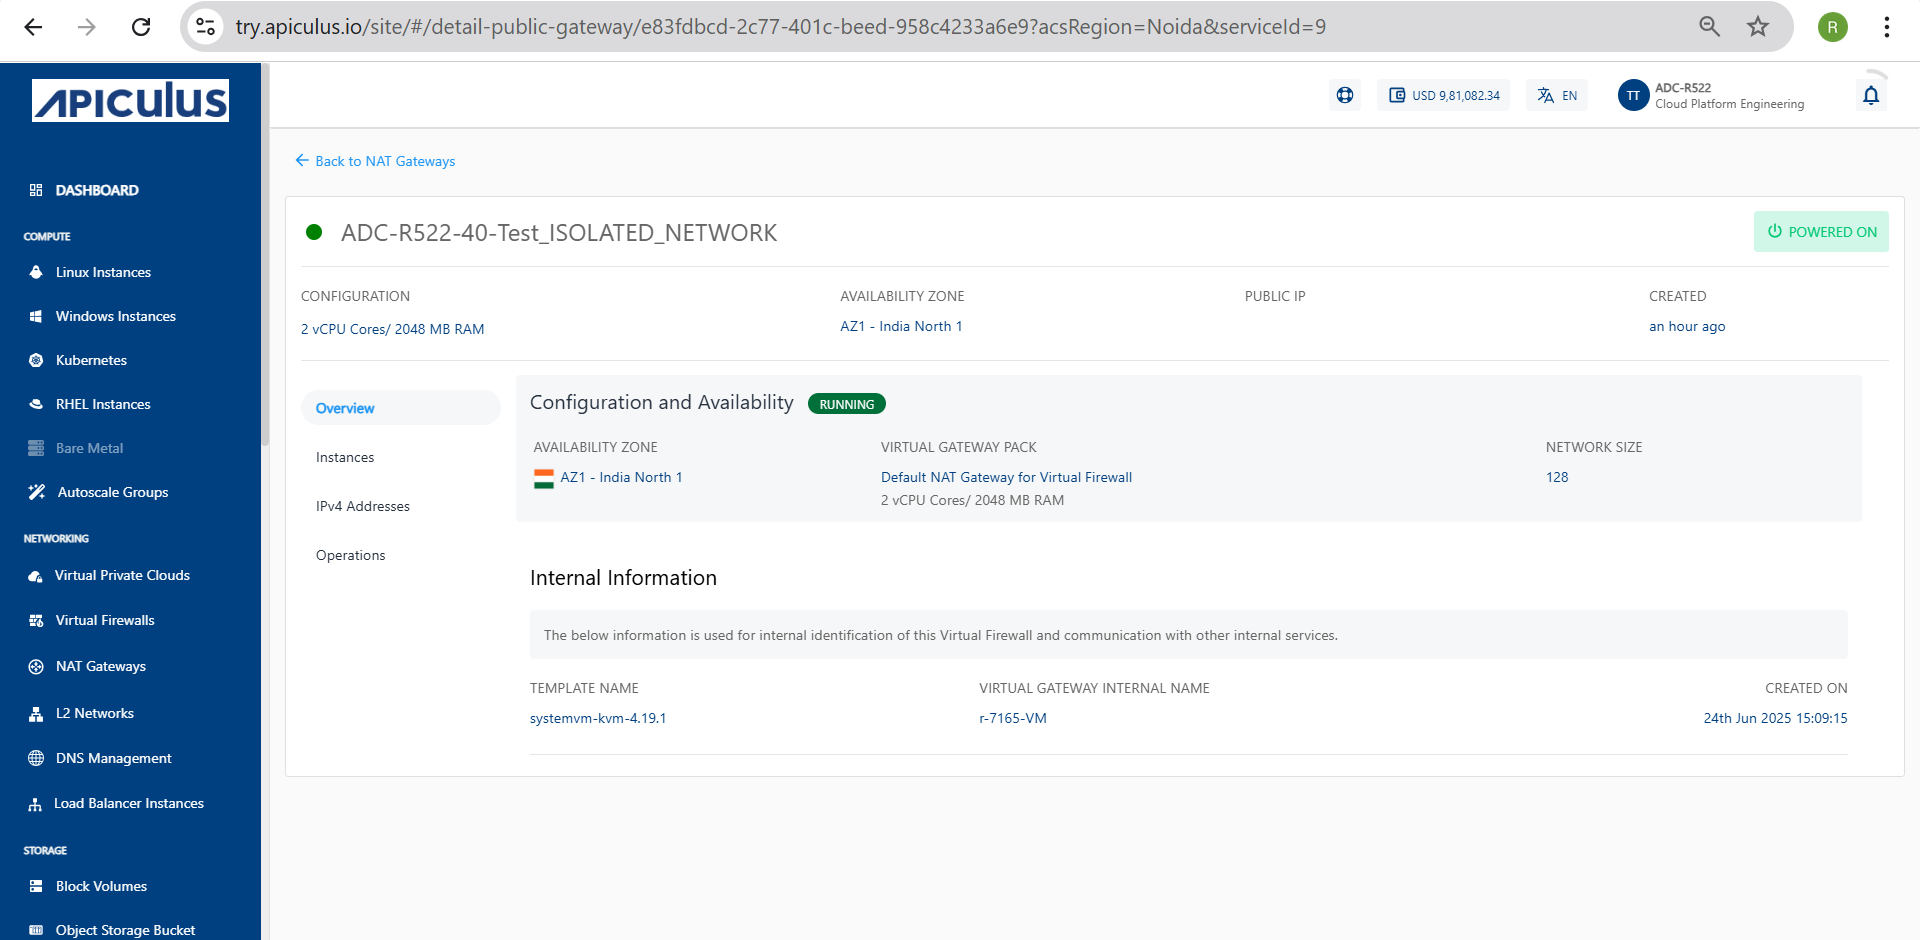
- NAT Gateway Configuration Overview: The following details summarize the key configuration parameters of the selected NAT Gateway.
- vCPU/RAM: For example 2 vCPU Cores / 2048 MB RAM (Indicates the computational resources allocated for the NAT Gateway).
- AVAILBILITY Zone: For example AZ1-India North 1 (The region or zone where the gateway is deployed).
- PUBLIC IP: The public-facing IP through which outbound traffic is routed.
- Check Operational Status: The NAT Gateway is in a RUNNING state, indicating it is active and fully operational.
- Confirm Network and Gateway Configuration: Review the virtual gateway pack and network size settings to ensure the correct configuration is applied before proceeding with port forwarding or deployment steps.
- Virtual Gateway Pack: Default NAT Gateway for Virtual Firewall.
- Network Size: 128 (Specifies the subnet size associated with the gateway).
- Access Internal Information for System Reference: The following internal configuration details are provided for system-level reference and tracking of the NAT Gateway within the Cloud environment.
- TEMPLATE NAME: systemvm-kvm-4.19.1 (Base image used to launch this NAT Gateway).
- VIRTUAL GATEWAY INTERNAL NAME: r-7165-VM (Used internally by for VM/gateway tracking and routing).
- CREATED ON: 24th Jun 2025, 15:09:15 (Exact timestamp of NAT Gateway provisioning).
Accessing Port Forwarding Settings for NAT Gateway
To enable external access to internal services hosted behind a NAT Gateway, you must configure port forwarding rules. This section explains how to access the port forwarding settings for a NAT Gateway within the Cloud environment. Port forwarding allows specific inbound traffic to reach designated internal resources by mapping external ports to internal IPs and ports.
The following steps outline the process to navigate to the NAT Gateway, locate the public IP address, and access the port forwarding configuration interface to add or manage rules effectively:
- In the left-hand menu, click on NAT Gateways under the Networking section.
- Select your NAT Gateway from the list (for example, ADC-R522-40-Test_ISOLATED_NETWORK).
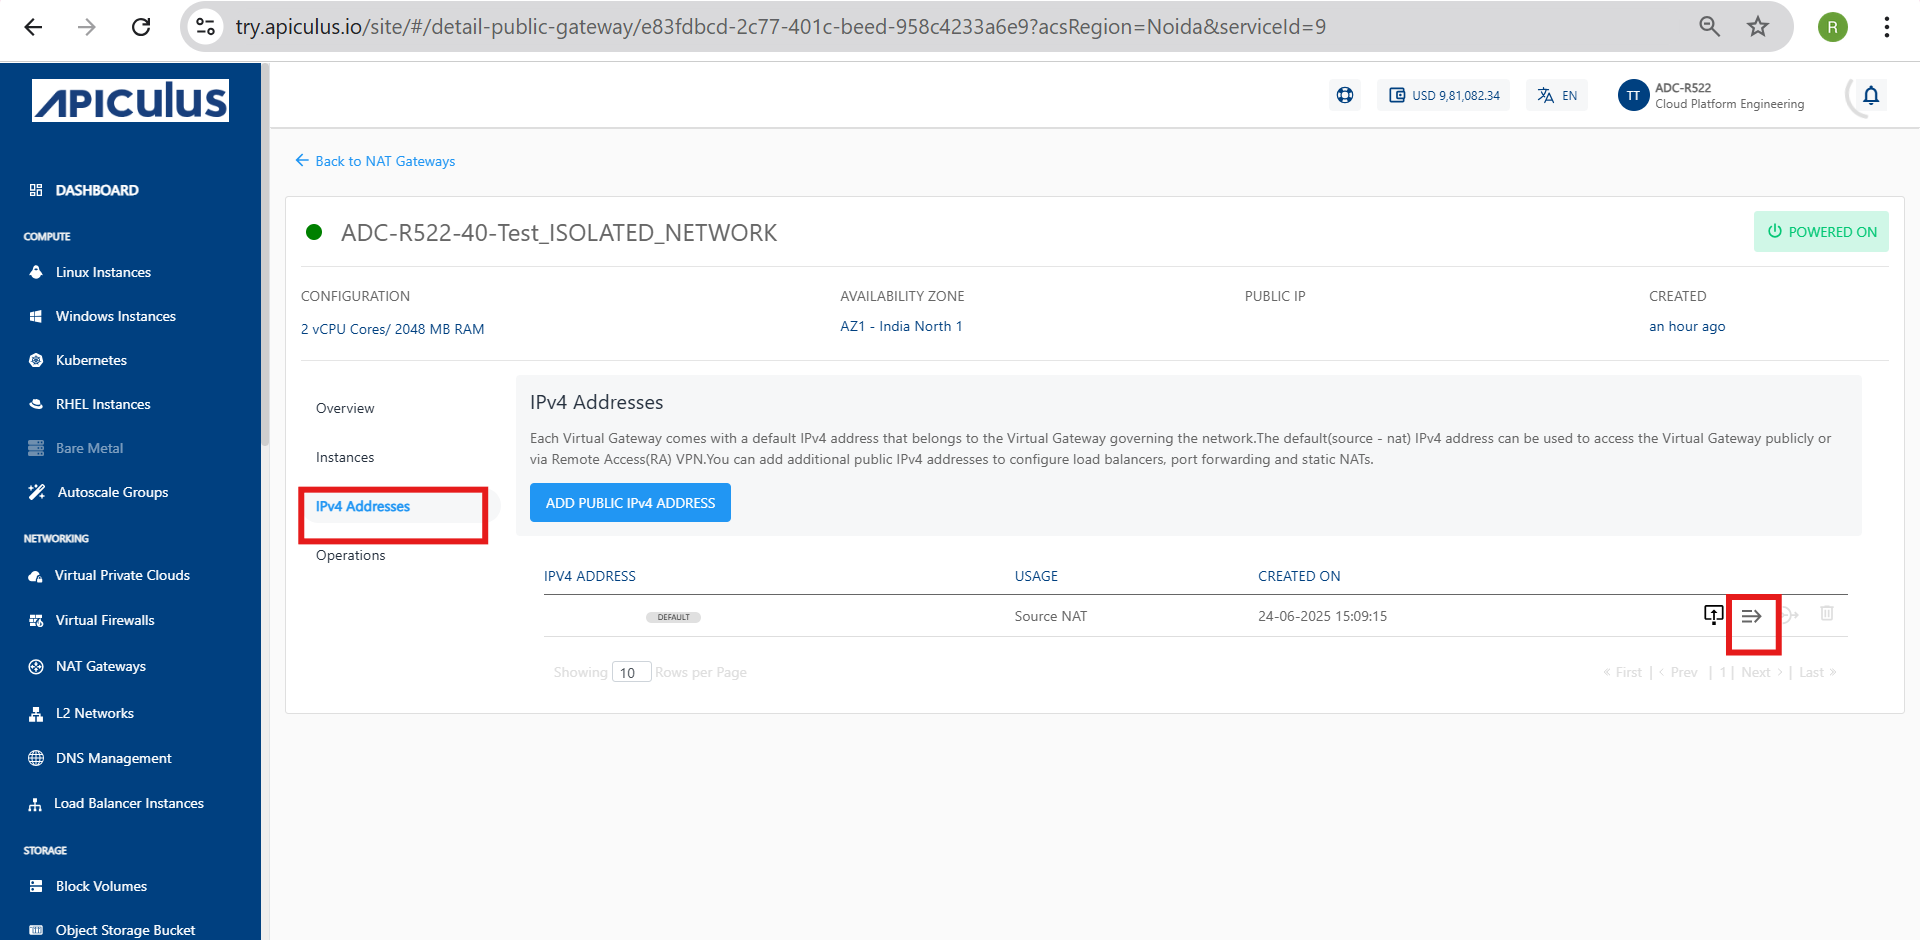
- In the gateway page, click on the IPv4 Addresses tab.
- Find your public IP address listed on this page.
- Click the Port Forwarding Rule icon (next to the IP address) to start adding a port forwarding rule.
Adding a New Port Forwarding Rule
To allow external access through a NAT Gateway in the Cloud Portal, you can add a new port forwarding rule. This involves selecting the appropriate NAT Gateway and configuring the necessary forwarding details.
The following steps guide you through logging into the Cloud Portal, navigating to the NAT Gateways section, selecting the relevant gateway, and initiating the process of creating a new port forwarding rule by accessing the Port Forwarding interface and reviewing any existing rules:
- Login to the Apiculus cloud platform.
- From the left-hand side menu, under the Networking section, click on NAT Gateways.
- Choose the NAT Gateway for which you want to configure the port forwarding rule (for example ADC-R522-40-Test_ISOLATED_NETWORK).
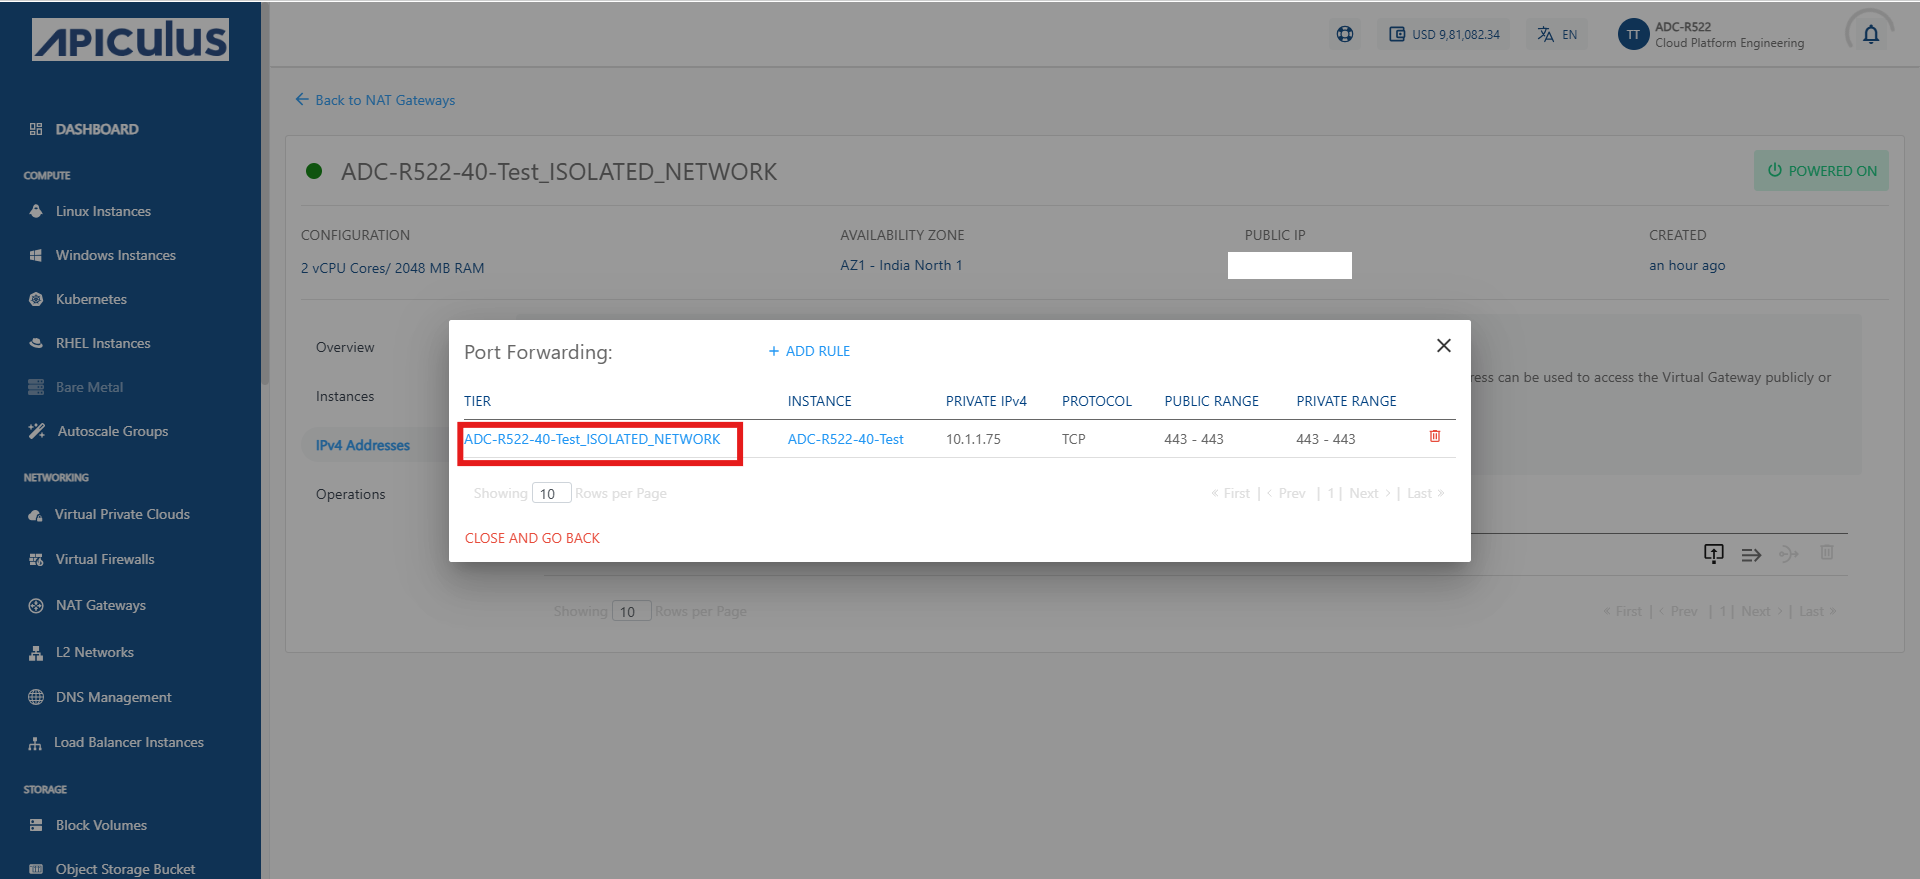
- Once inside the selected NAT Gateway, see a section titled Port Forwarding along with the public IP address.
- Click on the + ADD RULE button located next to the Port Forwarding heading. This opens the interface to add a new port forwarding rule.
- Review Existing Rules (Optional): Below the + ADD RULE button, you may see a list of existing rules including details like:
- TIER (for example, ADC-R522-40-Test_ISOLATED_NETWORK)
- INSTANCE (for example, ADC-R522-40-Test)
- PRIVATE IPv4 (for example, 10.1.1.75)
- PROTOCOL (for example, TCP)
- PUBLIC RANGE (for example, 443 - 443)
- PRIVATE RANGE (for example, 443 - 443)
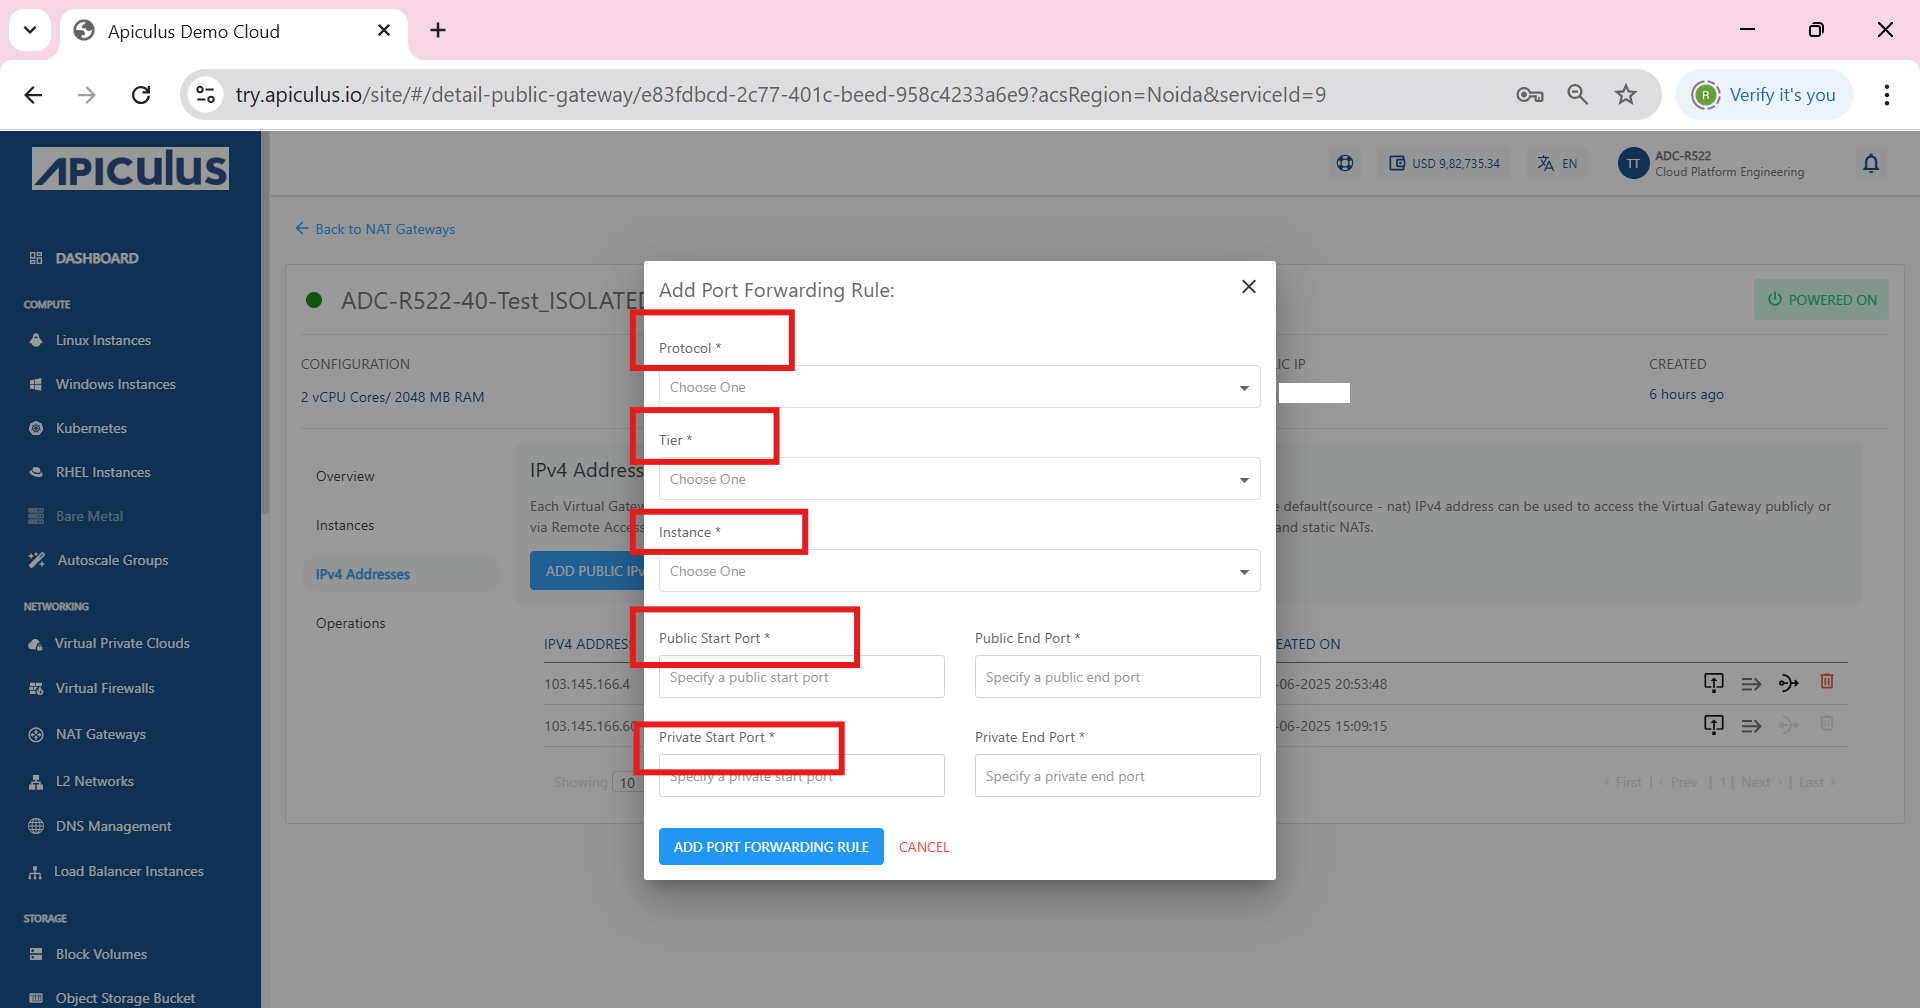
Adding Details and Creating Port Forwarding Rule
Once you click on + ADD RULE, a new form opens where you must enter the required information. These details define how incoming traffic on the public IP is routed to your internal instance.
The following steps guide you through completing the port forwarding rule form by selecting the appropriate protocol, tier, and instance, and by specifying the public and private port ranges required to establish the forwarding rule:
- After clicking on + ADD RULE a new form titled Add Port Forwarding Rule appears.
- Fill in all the required fields marked with a red asterisk (*):
- Protocol: Select the desired protocol from the dropdown (for example, TCP or UDP).
- Tier: Choose the appropriate tier from the list that maps to your network environment.
- Instance: Select the instance (virtual machine) that receives the forwarded traffic.
- Public Start Port: Enter the starting port number from the public IP address range.
- Public End Port: Enter the ending port number from the public IP address range.
- Private Start Port: Enter the starting port on the internal (private) IP to which traffic must be forwarded.
- Private End Port: Enter the ending port on the private IP.
If you want to forward only one port, enter the same value for start and end ports.
Same rule as above applies if forwarding a single port.
- Click on ADD PORT FORWARDING RULE to save and apply the new rule.
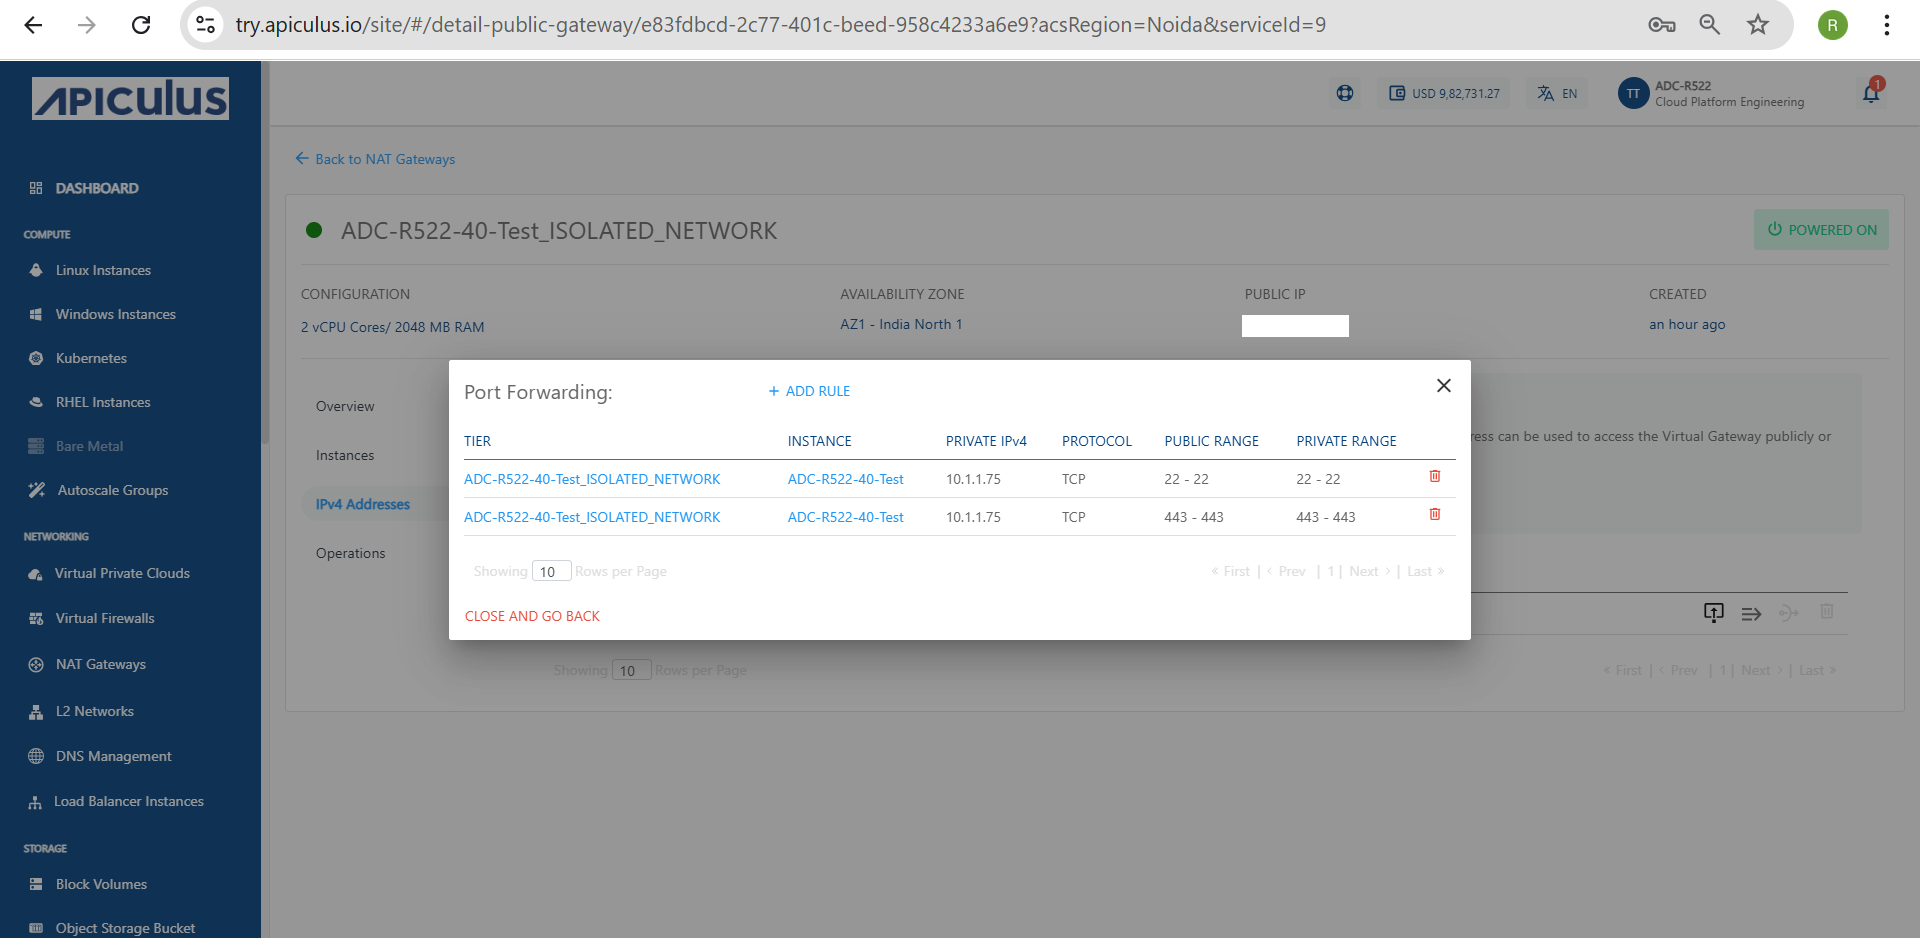
Verifying the Added Port Forwarding Rule
After creating the port forwarding rule, it is important to verify that it has been added correctly. This ensures that traffic is properly forwarded to the intended internal instance. Review the rule details listed under the Port Forwarding section to confirm everything matches your configuration.
The following steps guide you through locating the newly added rule in the Port Forwarding section, reviewing its associated tier, instance, IP addresses, and port ranges, and confirming that all values align with the configuration you specified during rule creation:
- Once the rule is added, it appears in the list under the Port Forwarding section for the selected public IP.
- Review the displayed rule details, which include:
- Tier name (for example, ADC-R522-40-Test_ISOLATED_NETWORK)
- Instance name (for example, ADC-R522-40-Test)
- Private IPv4 address (for example, 10.1.1.75)
- Protocol (for example, TCP)
- Public Range (for example, 22 - 22 or 443 - 443)
- Private Range (for example, 22 - 22 or 443 - 443)
- Ensure the information is accurate and matches the values you entered during rule creation.
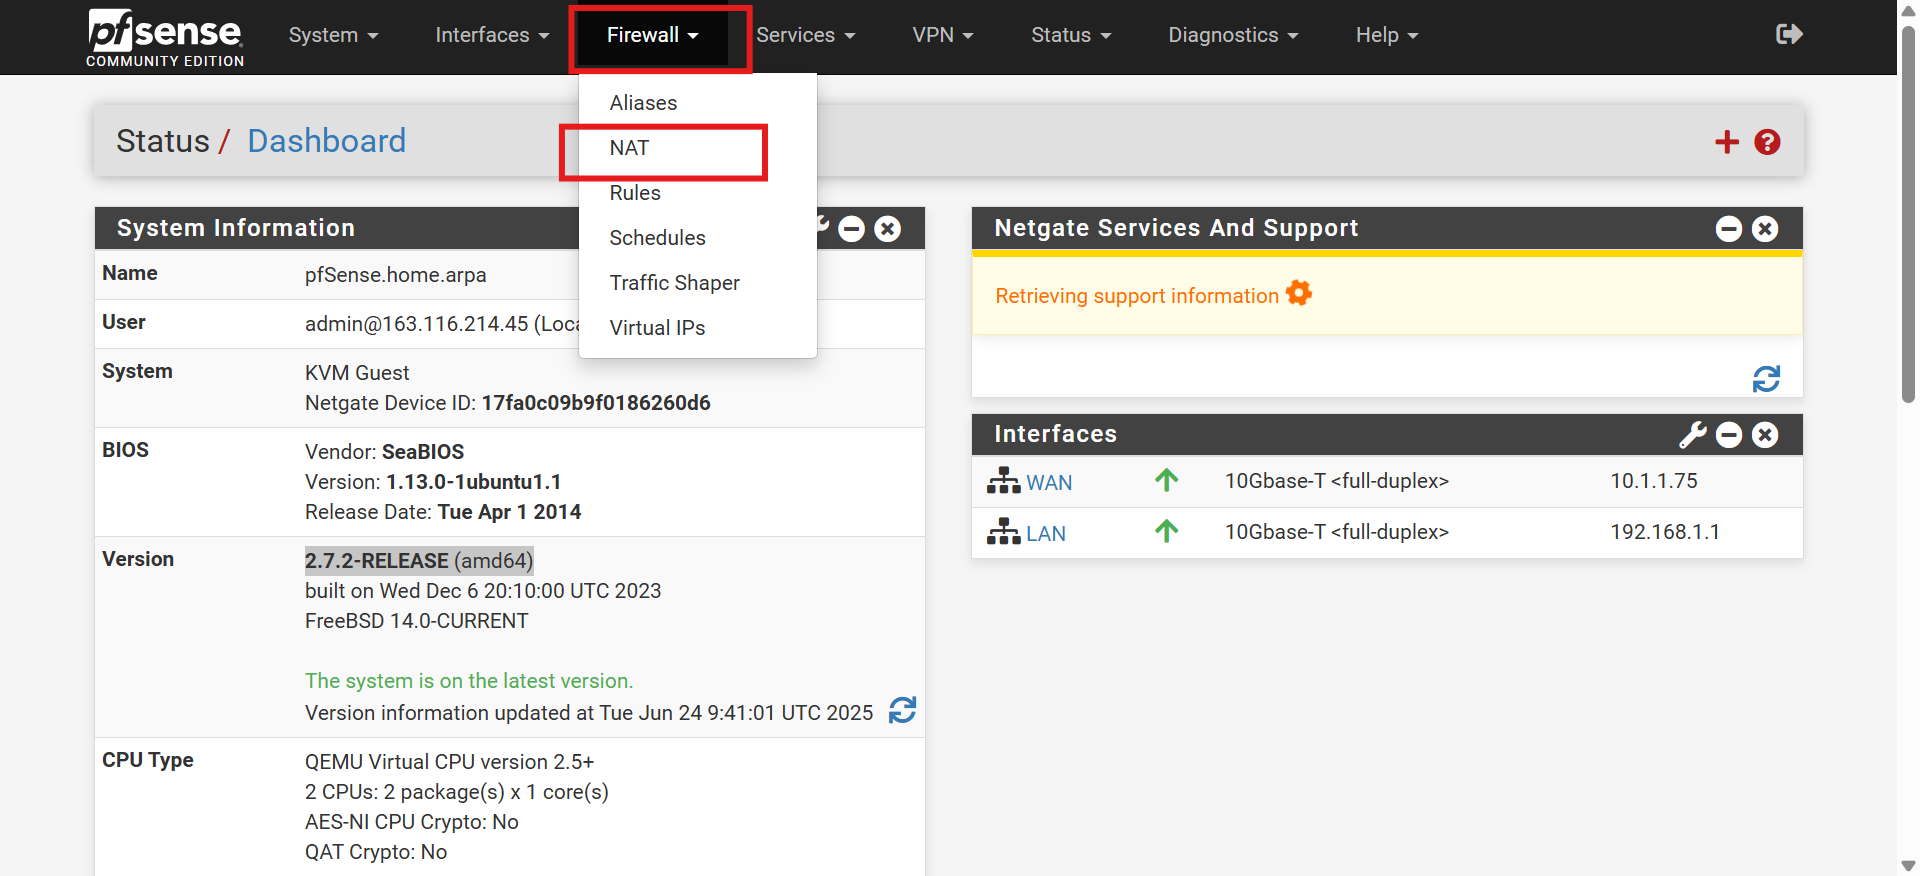
Configuring NAT Settings In pfsense Firewall
To fully enable port forwarding, you must set up the necessary NAT (Network Address Translation) rules in the pfsense firewall. This step ensures that incoming traffic on specific ports is correctly directed to your internal server.
The Following steps to access and configure the NAT settings:
- Log in to the pfSense Firewall using the IP address shown in the browser.
- From the top menu bar, click on the Firewall .
- In the dropdown menu under Firewall, select NAT (as shown highlighted in the image).
- This takes you to the NAT settings page, where you can configure the required port forwarding rules for pfsense.
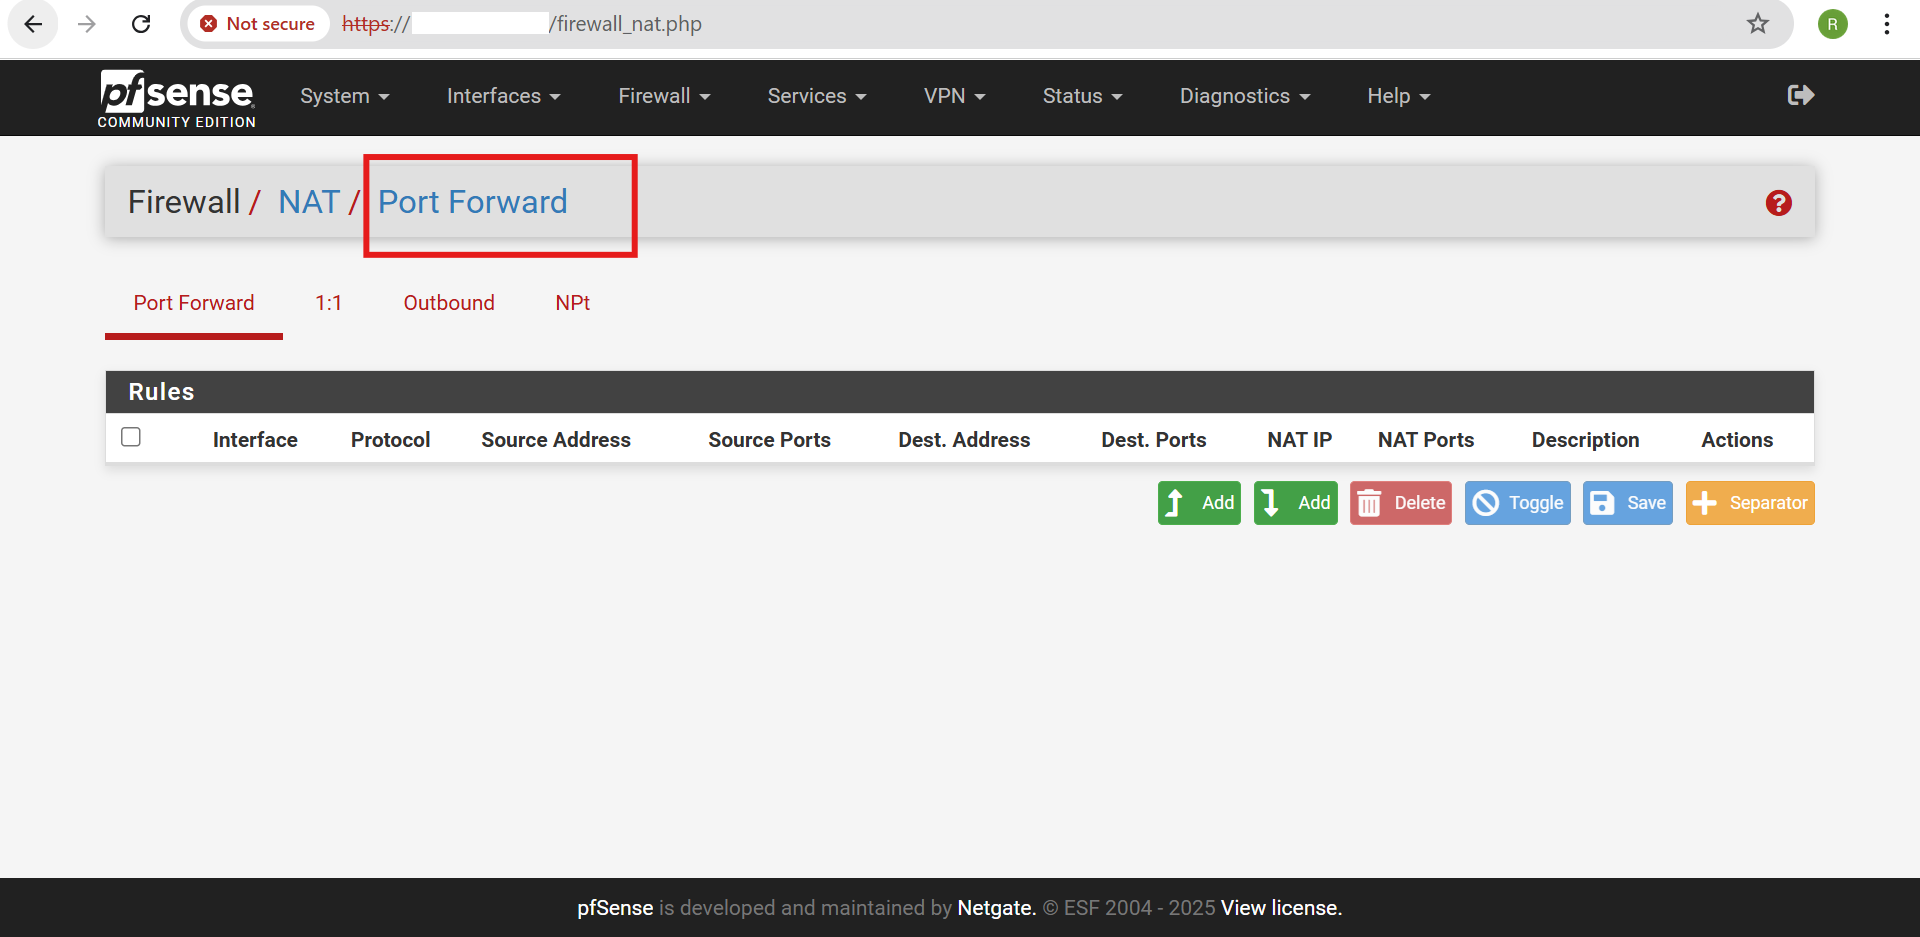
Adding a New Port Forward Rule in pfsense Firewall
To enable traffic redirection to an internal server, you must create a new Port Forward rule in the pfsense firewall. This rule helps map incoming traffic on a specific port to the desired internal IP and port within your network.
The following steps to add the rule and configure the necessary settings, including interface selection, protocol type, port range, and internal destination details, to ensure accurate traffic forwarding through the pfsense firewall:
- Ensure you're in the Port Forward tab under the Firewall > NAT section.
- Click on the green Add button (with the upward arrow icon) on the right side of the page to create a new port forwarding rule.
- This opens the configuration form where you can define the interface, protocol, source and destination addresses, ports, and the internal (NAT) IP to forward the traffic to.
Adding a Rule with Value
To define specific port forwarding behavior, you can manually add a rule with precise values that match your network and access requirements. This allows you to control how incoming traffic on selected ports is redirected to internal resources within your environment.
The following steps guide you through filling out each required field to ensure accurate and secure forwarding of incoming traffic to the intended internal server.
- Click on the Add button to create a new port forwarding rule.
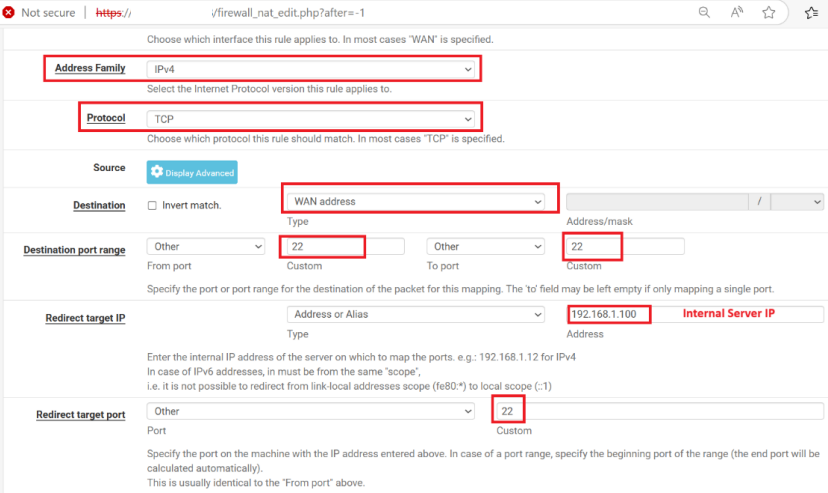
- Fill in the Rule Details as per requirement:
- Interface: Select WAN
- Address Family: Choose IPv4
- Protocol: Select TCP
- Destination: Choose WAN address
- Destination port range:
- From Port: 22
- To Port: 22
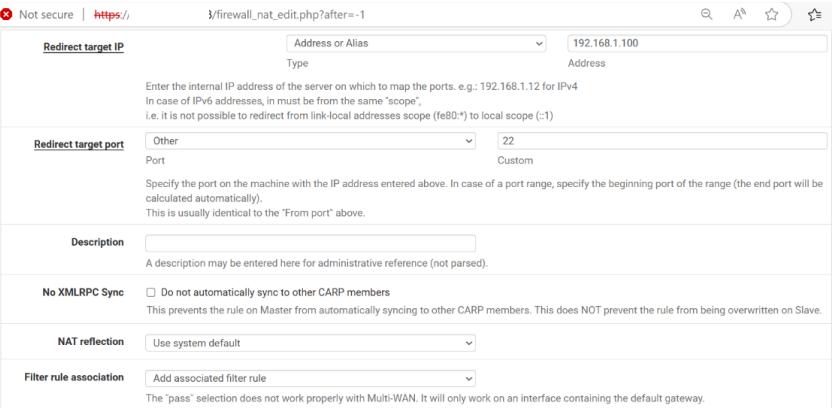
- Redirect target IP: Enter the internal IP address of the server (for example, 192.168.1.100)
- Redirect target Port: Enter the port number 22
- Description(Optional): Add a short note for reference.
- NAT reflection: Leave as Use system default.
- Filter rule association: Choose Add associated filter rule.
- Click on Save and then apply the changes to activate the rule.
Verifying SSH Access Using Public IP
Once the port forwarding rule has been successfully created in pfsense, the next step is to verify that external SSH access to the internal virtual machine (VM) is functioning as expected. This involves using an SSH client, such as PuTTY, to connect to the VM via the firewall’s public IP address and the forwarded port. If the configuration is correct, the connection is established and the VM’s shell access becomes available remotely.
The following steps guide you through initiating an SSH session using the public IP to confirm that the port forwarding rule is working correctly and external connectivity to the internal VM is operational:
- Open PuTTY or any SSH client on your local machine.
- Enter the Public IP of the pfsense WAN interface and port 22 in PuTTY.
- On the first connection attempt, a security alert window pops up showing the host key is not cached.
- Click Accept to store the key and proceed with the connection.

Verifying VM Information and IP Configuration
This section helps you check the basic details of your virtual machine. After logging in, you can view the system status and find the IP address to make sure the VM is running and connected to the network.
The following steps guide you through logging into the VM terminal, reviewing system and network information, identifying the correct network interface and IP address, and checking for any available software or OS updates:
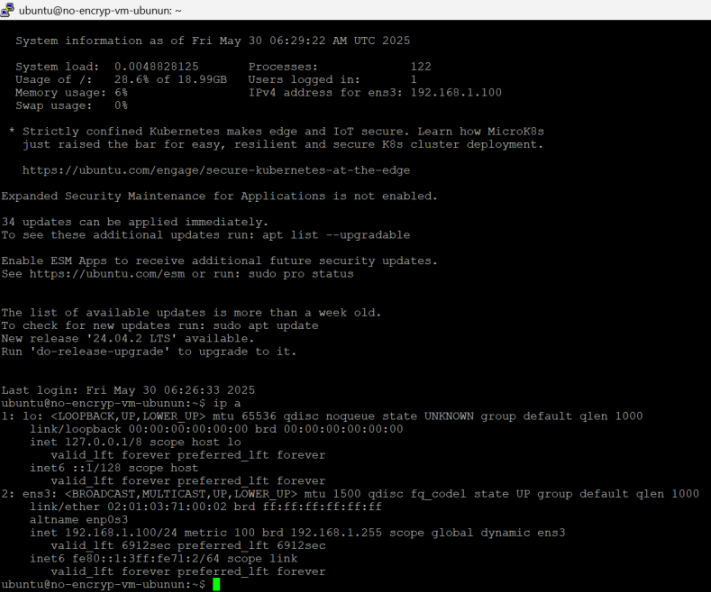
- Log in to the VM terminal.
- Check system status (CPU, memory, processes, IP) – shown on login.
- Note the IP address (for example, 192.168.1.100 on interface ens3).
- Check for updates by running:
sudo apt update - See upgradeable packages by running:
apt list --upgradable - Check for OS upgrade: New version
24.04.2 LTSis available. - Run the IP command using:
ip a - Confirm network interface IPs:
lo= 127.0.0.1ens3= 192.168.1.100 (IPv4), fe80::... (IPv6)